Introduction
This basic protocol will take very little time and will easily catch most student errors, including those made by students who make models by entering coordinates into the Gene Model Checker by guessing. While you can use this protocol for screening annotations at any point in the annotation process, we recommend that you use it while students are in the midst of annotating, so that you can give them immediate feedback. If students properly prepare the “mini-report form” as described below, checking a single isoform should take no more than 3–5 minutes. (Time estimates are based on checking a fully correct model where everything is consistent.) The idea is to quickly screen for “red flags.” Once you find a red flag you can either:
-
give the information back to the student, asking them to defend or correct their gene model;
-
double-check the annotation and correct the model (as needed) yourself;
-
add a note to the full gene report form with details on these red flags.
|
|
We strongly recommend #1 — this is a learning opportunity in many ways! |
All of the items below can be addressed from the Gene Model Checker and are quick enough to do during a lab period. Simply follow the protocol, looking at the dot plot, the protein sequence alignment, and the gene model as a custom track. If you wish to check gene models outside of class, have students create and send you a “mini report form.” All of the items in the mini report form are required for the Annotation Report form for the F Element project, so creating a mini report is time well spent. If you are checking a single gene with one unique isoform, have the students include in the mini report the GFF file and screenshots of the dot plot and of the protein sequence alignment (all are generated by the Gene Model Checker). If you are checking a project with multiple genes or a single gene with multiple isoforms, have the students include all of the above items for each isoform in the project as well as a screenshot of the “Isoform Checklist” from the Annotation Files Merger. The “Isoform Checklist” will show if all of the isoforms are accounted for, so use that to screen projects for potentially missing isoforms.
The three annotation checks suggested below start from the quickest, with the lowest resolution, and move progressively to the more detailed. Below is an example; use your own judgment as to which of these techniques will work best in your particular situation.
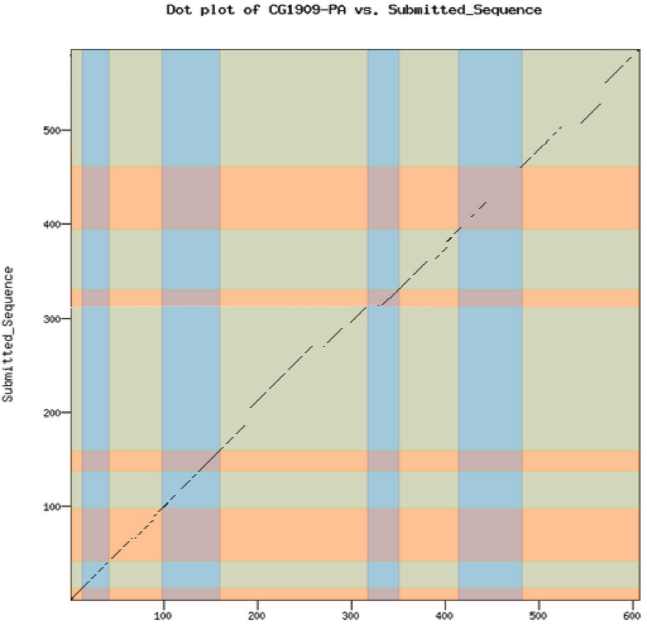
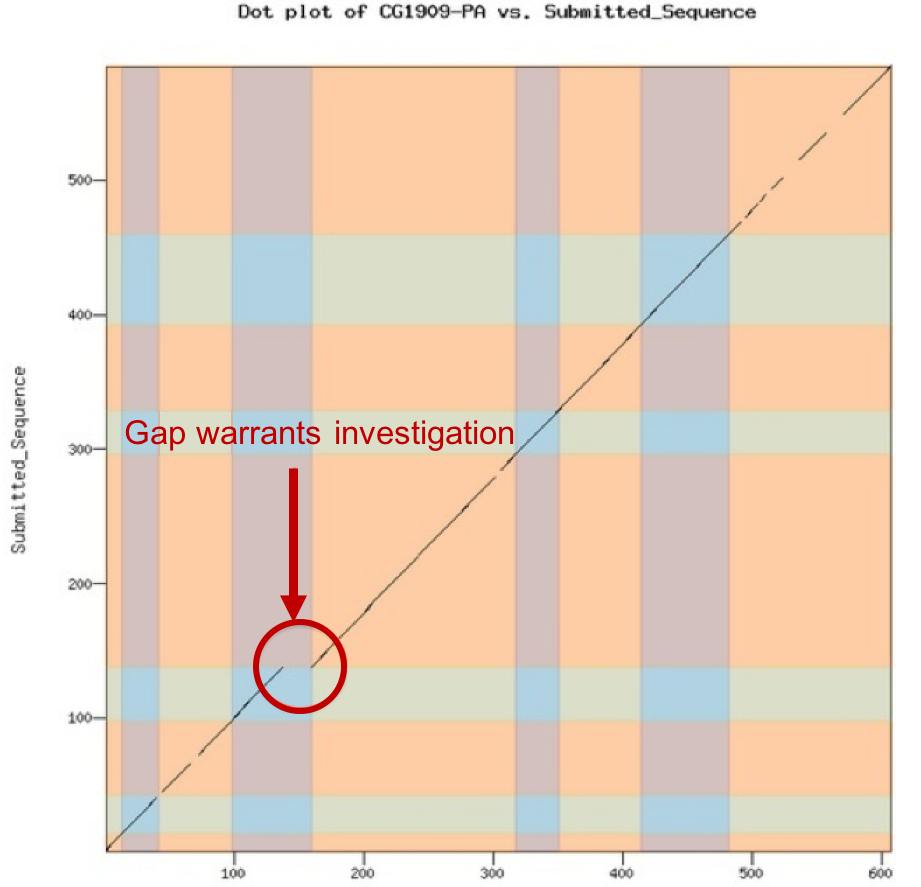
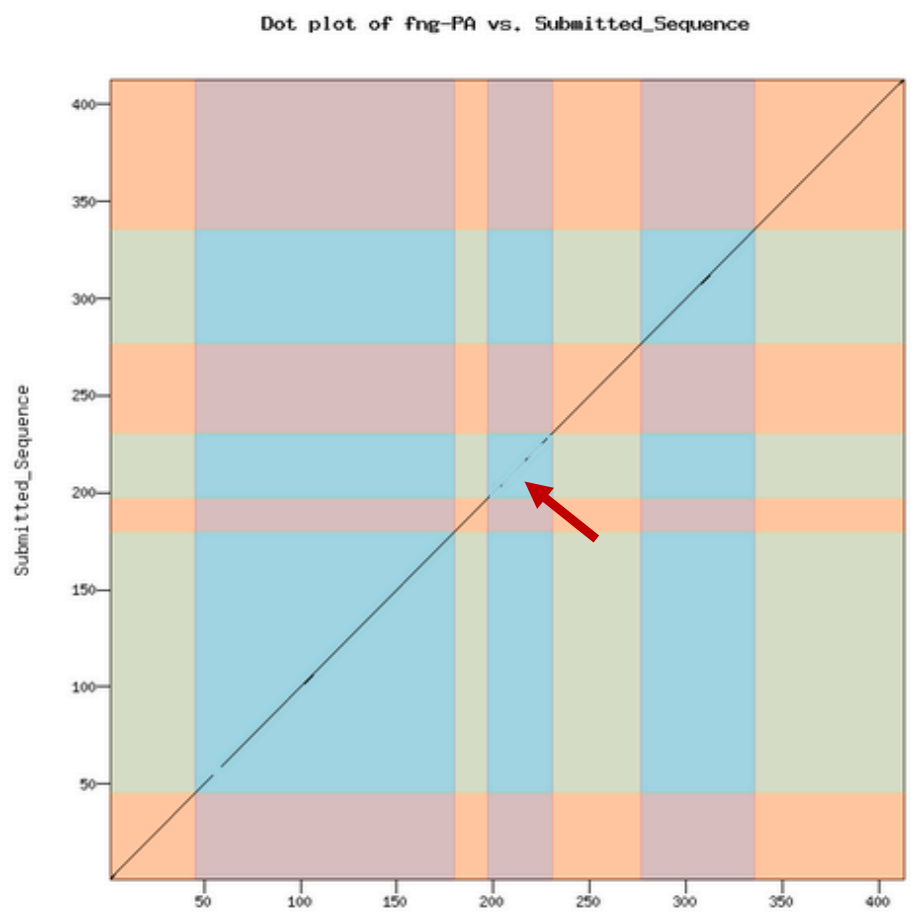
Dot plot from Gene Model Checker
These dot plots have low sensitivity (i.e., small shifts may not be visible) but they can catch obvious errors very quickly, so examine these first if you want to give students rapid feedback on their model. The dot plot compares the D. melanogaster protein sequence to the amino acid sequence predicted by the student’s gene model. If the two are identical, you will see a straight line from the lower left corner to the upper right corner. The line will become dashes in regions of low sequence similarity or completely blank in regions with no similarity. Shifts off from the diagonal indicate insertions or deletions (indels). Shifts at an exon boundary typically indicate changes in exon length. The frequency of these shifts depends on the evolutionary distance between the informant and target genomes — these shifts are rare in closely-related species, but they do occur. The result of a dot plot is not sufficient evidence to claim that a student has made an error, but they do highlight regions that should be examined carefully for confirmation. Examine the dot plot for obvious shifts at exon boundaries. Remember that the ONLY thing that an annotator calls is a series of numbers that define the beginning and end of each exon. Consequently, while it is possible that a student could miscall an entire exon completely, this is rare. Most errors will be at intron/exon boundaries which will result in an exon of incorrect length.
-
Look for large obvious shifts; don’t worry about minor shifts, they will become apparent in the subsequent protein alignment check.
-
Look for shifts or regions that don’t make sense evolutionarily and are likely caused by a missing an entire exon, as opposed to miscalling the exact position of the end of an exon. Suggestion of a missing exon or large indels (e.g., premature truncation of an exon) should be viewed with suspicion and require strong evidence to support the model.
Full amino acid alignment from Gene Model Checker
This is a more sensitive test, as you will be able to detect exon boundaries that differ by as little as a single amino acid. Insertions and deletions (indels) this small are typically undetectable in the dot plot. In these alignments, the D. melanogaster ortholog is on the top and the student gene model is on the bottom. Look for length differences in the aligned amino acids especially around the exon splice sites (i.e., where there is a change in font color). Focus in on every exon boundary looking for indels. For species that are closely related to D. melanogaster (e.g., D. erecta and D. biarmipes), even a single amino acid indel should be viewed with suspicion and defended with evidence (i.e., RNA-Seq). Where there is no RNA-Seq data, our annotation protocol calls for a model with minimal differences between the D. melanogaster gene product and that of the new species being annotated.
-
Look for any large insertions/deletions anywhere in the alignment.
-
If they are internal to a single exon, one should reevaluate models considering a change in the number of exons (i.e., evaluate the possibility of a “new” intron or “new exon” that could reduce or completely remove the large indel).
-
If the indel is found at an exon boundary, look for and consider splice sites located at positions that conserve exon length even if they do not conserve amino acids.
-
-
Also, focus on the boundaries between exons — are there any gaps, even as small as a single amino acid that coincide with the exon boundaries? If so, examine the boundary region closely; have we lost conserved amino acids? Or is there a better model using a splice site that would maintain these amino acids in the model?
GEP UCSC Genome Browser with custom tracks
The two methods above can only highlight potential problems that might have a better solution but they cannot in and of themselves provide strong evidence that a model is indeed incorrect. Thus, if your goal is to simply give students feedback on their gene models (recommended), simply use the above two “quick checks.” However, if you wish to carefully check the gene models for errors, and you want to be able to report back to students that they have most likely made an error (or you are correcting gene models prior to submission), we recommend the use of custom tracks to visualize the student gene models from within the genome browser, where most of the annotation evidence will be available to you.
If you are giving immediate feedback to students while they are checking their models, you can open a browser with the student model as a track directly from the Gene Model Checker. Right-click on any spyglass icon in the view column (or hold down the control key and click if using a Mac) and select the “Open Link in New Window” option. This genome browser will have the entire student model added as a custom track; simply navigate as usual to any region for a close inspection. Alternatively, at any time, you can click on the “add custom tracks” button to add a student model to the genome browser. Simply upload the GFF file on the “add custom tracks” page and return to the browser. Once you are comfortable with using custom tracks, the following protocol should take no more than a few minutes to check a valid gene model with a typical number of exons.
-
Open the genome browser from the Gene Model Checker or use the GFF file with the student model(s) to create a genome browser with the model as a custom track
-
For a quick check, set the display modes for most tracks to “hide” except the Custom model, RNA-Seq Read Coverage, and Splice Junctions tracks. Other tracks may be added for more in-depth double checking
-
Zoom in sufficiently so that you can examine each intron/exon boundary at the base pair level with respect to RNA-Seq and/or other data.
-
Use the double-triangle at the extreme ends (at the far right or far left) of the custom track to quickly jump to the next intron/exon junction
-
Estimated time: 5–10 seconds per intron/exon boundary
-